Examples
Keel can be used in many different environments with a bunch of various settings. See these examples to understand which configuration suits your needs.
Example 1: Push to deploy
In this tutorial, we will configure several tools to enable automated Kubernetes updates on Git push. This workflow is mostly useful when developing apps for Kubernetes. For production, we recommend tag approach where a tagged release would trigger an image build and Keel update policies would increase the version.
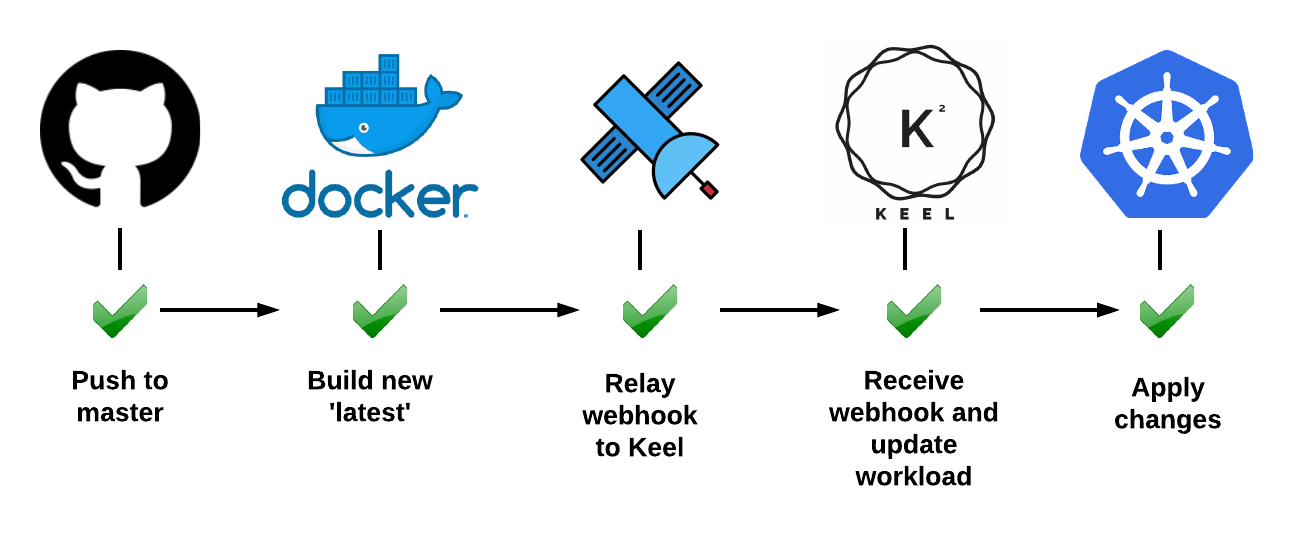
Once a workflow is ready, any push to the master branch (or merge requests from develop/feature branches) will update your app running in Kubernetes.
In this tutorial we will use:
- Minikube - our local development Kubernetes environment. Mac users are free to use Docker for Mac with Kubernetes support, works fine!
- Helm - Kubernetes package manager
- GitHub - we will store our code here
- DockerHub - our Docker images will be built and stored here
- Webhook Relay - will relay public webhooks to our internal Kubernetes environment so we don't have to expose Keel to the public internet
Set up GitHub repository
First, let's set up our versioning control system. Let's create a local repo of our example app and push it to our GitHub repository.
Our example app will be a really really simple one:
package main

import (
    "fmt"
    "log"
    "net/http"
)

var version = "v0"

func main() {
    http.HandleFunc("/", func(w http.ResponseWriter, r *http.Request) {
        fmt.Fprintf(w, "Welcome to my website! Version %s", version)
    })
    fmt.Printf("App is starting, version: %s \n", version)
    log.Fatal(http.ListenAndServe(":8500", nil))
}
Dockerfile and Kubernetes deployment files can be found here: https://github.com/keel-hq/push-workflow-example.
Commit your code and push to remote:
git add .
git commit -m "first"
git push origin master
Create Kubernetes namespace
To keep things isolated, create a new Kubernetes namespace:
kubectl create namespace push-workflow
From here, we will use namespace called 'push-workflow'. You can choose any other name, just update following commands to target your namespace.
It's also handy to set this namespace as your current context:
kubectl config set-context $(kubectl config current-context) --namespace=push-workflow
Enable Webhook Relay forwarding
Webhook Relay operator will create a public endpoint and destination where to forward webhooks. Let's install it:
helm repo add webhookrelay https://charts.webhookrelay.com
helm repo update
Get access token from here. Once you click on 'Create Token', it will generate it and show a helper to set environment variables:
export RELAY_KEY=*****-****-****-****-*********
export RELAY_SECRET=**********
Install through Helm:
helm upgrade --install webhookrelay-operator --namespace=push-workflow webhookrelay/webhookrelay-operator \
  --set credentials.key=$RELAY_KEY --set credentials.secret=$RELAY_SECRET
To view installed application:
helm list
NAME                 	NAMESPACE    	REVISION	UPDATED                                	STATUS  	CHART                      	APP VERSION
webhookrelay-operator	push-workflow	1       	2020-06-21 15:39:32.978269521 +0100 BST	deployed	webhookrelay-operator-0.1.3	1.16.0
Once operator is deployed, you can create a simple CR (Custom Resource, located in the push-workflow-example repository) that will let you receive and forward webhooks:
# webhookrelay_cr.yaml
apiVersion: forward.webhookrelay.com/v1
kind: WebhookRelayForward
metadata:
  name: keel-forward
spec:
  buckets:
  - name: dockerhub-to-keel
    inputs:
    - name: dockerhub-endpoint
      description: "Public endpoint"
      responseBody: "OK"
      responseStatusCode: 200
    outputs:
    - name: keel
      destination: http://keel:9300/v1/webhooks/dockerhub
      internal: true
kubectl apply -f webhookrelay_cr.yaml
You should see two pods running now:
$ kubectl get pods
NAME                                           READY   STATUS    RESTARTS   AGE
keel-forward-whr-deployment-869c4d4c86-txptt   1/1     Running   0          17s
webhookrelay-operator-74984df6d8-l475z         1/1     Running   0          9m31s
If you use kubectl describe command on the created CRD, you should be able to see your public endpoint (you can also view it if you go to your buckets page):
$ kubectl describe webhookrelayforwards.forward.webhookrelay.com keel-forward
...
...
Status:
  Agent Status:  Running
  Public Endpoints:
    https://gz66jjp2wvfczfsjhoxutk.hooks.webhookrelay.com
  Ready:           true
  Routing Status:  Configured
Grab that ***.hooks.webhookrelay.com URL, we will need it in the next step.
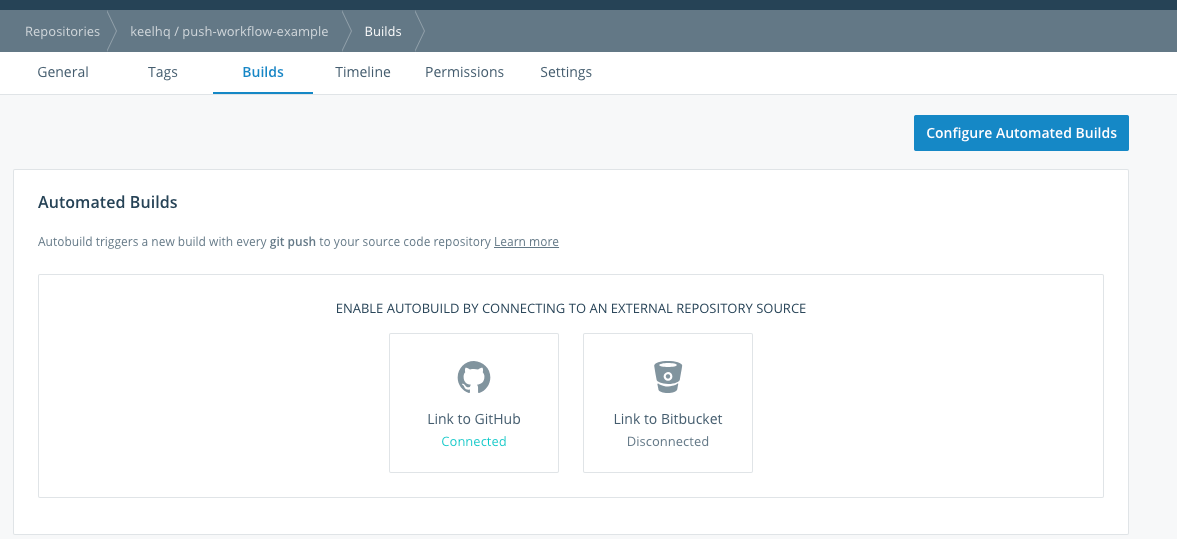
Configure DockerHub (code repository + webhook)
Now, we need to tell DockerHub to build a new image on every GitHub push to the master branch. First, go to https://cloud.docker.com, then Repositories and click on Create button. Once you have created the repository, link it to your GitHub account and click on Configure Automated Builds:
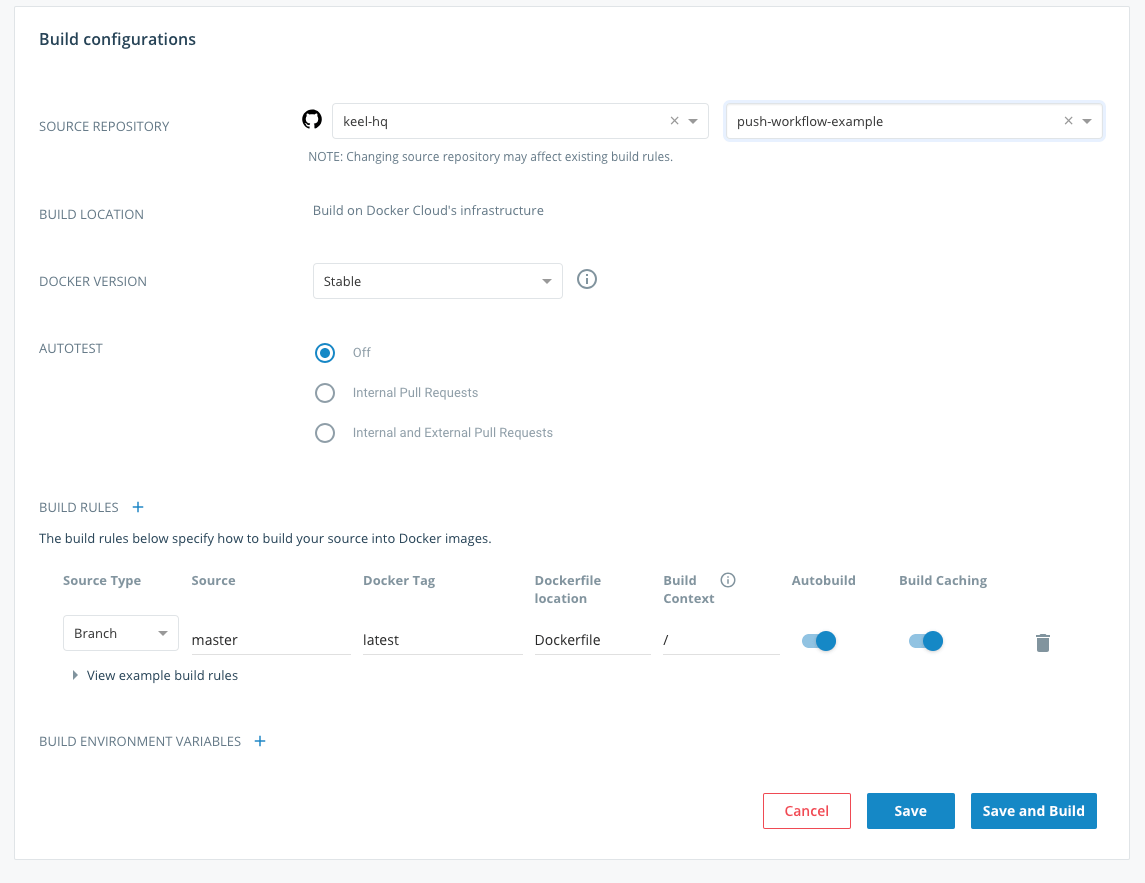
Select your GitHub repository and create a trigger that will:
- React to changes on a
masterbranch - Tag image as
latest
Ensure that autobuild is switched on and click on "Save and Build". You will get your first image prepared.
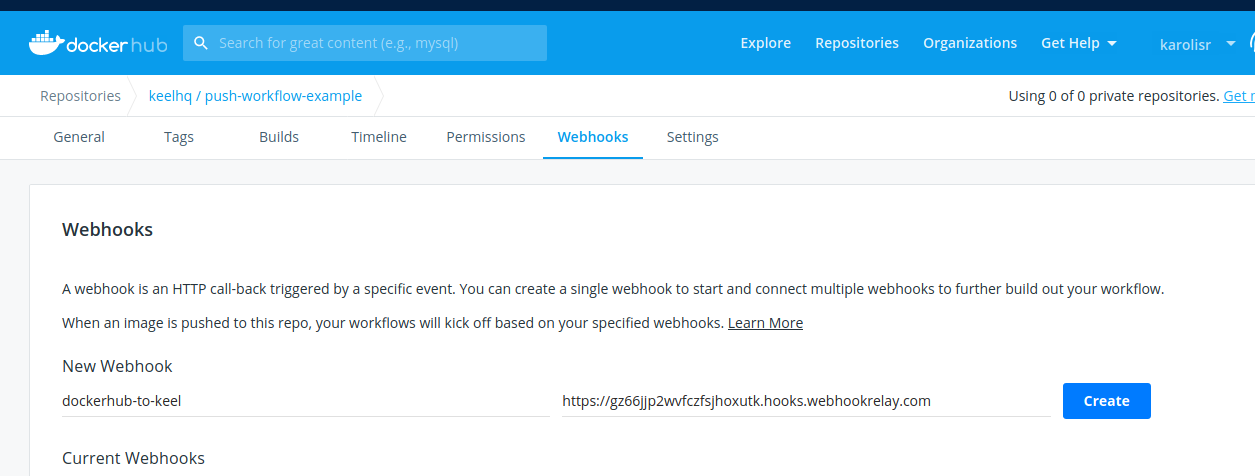
Also, we will need to setup DockerHub webhooks to Keel via Webhook Relay. To configure webhooks, go to https://hub.docker.com:
Deploying Keel
helm repo add keel https://charts.keel.sh
helm repo update
And install it (we are disabling Keel's helm provider here as we are only going to work with Kubernetes manifests):
helm upgrade --install keel --namespace=push-workflow keel/keel --set helmProvider.enabled="false" --set service.enabled="true" --set service.type="ClusterIP"
Deploy your app
Now, we need to create a deployment file of our app:
apiVersion: apps/v1
kind: Deployment
metadata:
  name: pushwf
  labels:
    name: "pushwf"
  annotations:
    # force policy will ensure that deployment is updated
    # even when tag is unchanged (latest remains)
    keel.sh/policy: force
spec:
  replicas: 1
  revisionHistoryLimit: 5
  selector:
    matchLabels:
      app: pushwf
  template:
    metadata:
      name: pushwf
      labels:
        app: pushwf
    spec:
      containers:
        - image: keelhq/push-workflow-example:latest
          imagePullPolicy: Always # this is required to force pull image
          name: pushwf
          ports:
            - containerPort: 8500
          livenessProbe:
            httpGet:
              path: /
              port: 8500
            initialDelaySeconds: 10
            timeoutSeconds: 5
Save it as deployment.yaml and create it via kubectl:
kubectl create -f deployment.yaml
Check whether it's running:
$ kubectl get pods
NAME                      READY     STATUS    RESTARTS   AGE
pushwf-8476855f97-nw4st   1/1       Running   0          1m
$ kubectl logs pushwf-8476855f97-nw4st
App is starting, version: v0
Push to update
Now, update your Go program's version string to v1:
package main

import (
    "fmt"
    "log"
    "net/http"
)

var version = "v1"

func main() {
    http.HandleFunc("/", func(w http.ResponseWriter, r *http.Request) {
        fmt.Fprintf(w, "Welcome to my website! Version %s", version)
    })
    fmt.Printf("App is starting, version: %s \n", version)
    log.Fatal(http.ListenAndServe(":8500", nil))
}
Commit and push. In a minute or two (depending on how fast DockerHub can build your image) our app should be updated. Since it's using webhooks, an update should be pretty much instantaneous.
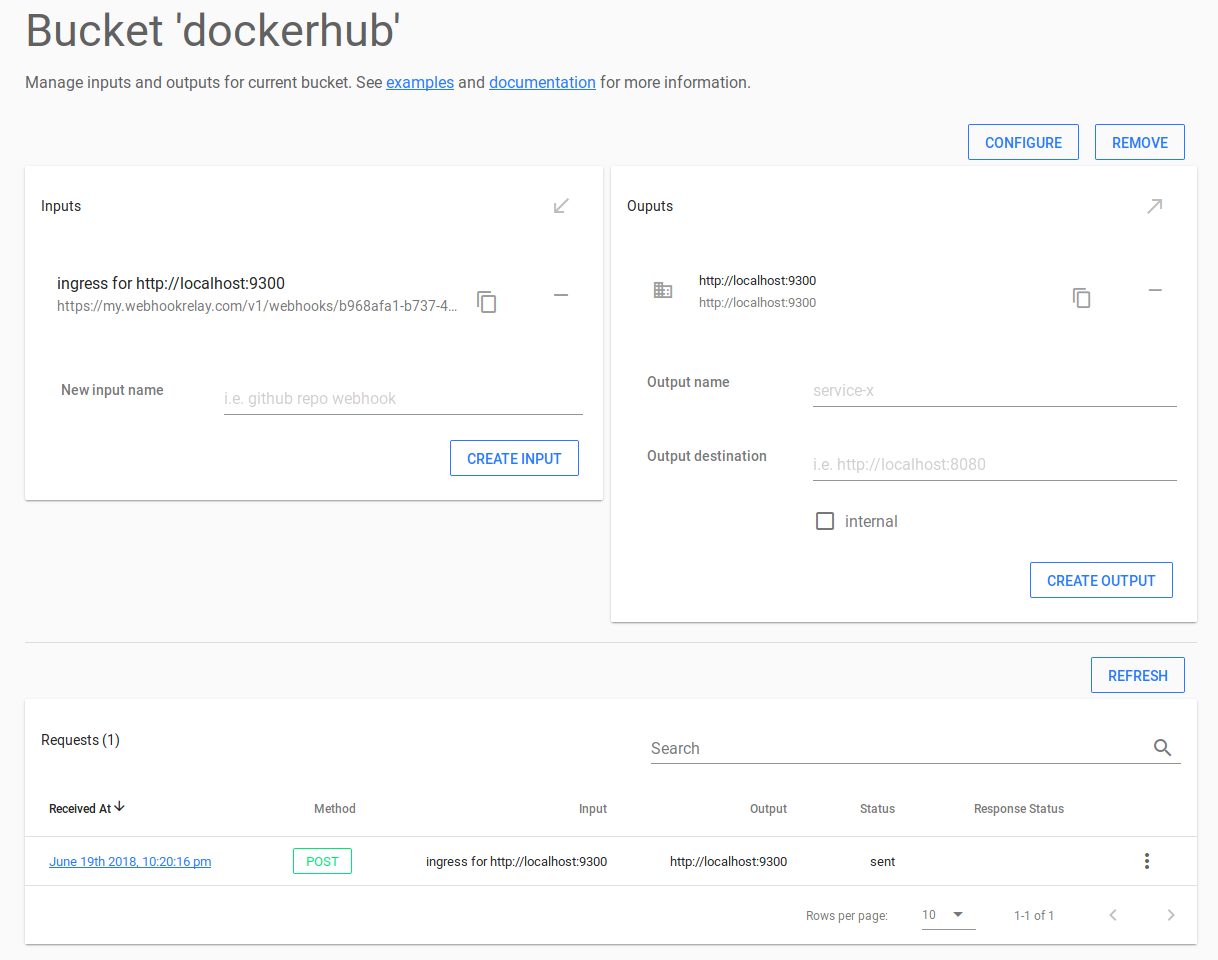
If you visit Webhook Relay dockerhub bucket's page, it should show relayed webhook:
Let's check our deployments rollout history:
$ kubectl rollout history deployment/pushwf
deployments "pushwf"
REVISION  CHANGE-CAUSE
1         <none>
2         keel automated update, version latest -> latest
And logs, just to be sure that our application is running the latest code:
$ kubectl get pods
NAME                      READY     STATUS    RESTARTS   AGE
pushwf-74c574f9cf-l6lq2   1/1       Running   0          4m
$ kubectl logs pushwf-74c574f9cf-l6lq2
App is starting, version: v1
Conclusion
While setting up Keel and Webhook Relay can take several of your precious minutes away, it saves an enormous amount of time later. Not only you get an instant update to your applications based on policies but you also ensure that you won't update wrong cluster or environment by mistake. And, of course, you won't even need to use kubectl for your application updates.
Once Keel is set up in your cluster in can manage many (all) of your applications. When you add your next app to the cluster, just specify the policy and point DockerHub webhook to the same Webhook Relay endpoint. Keel will filter out relevant deployments based on webhook payload and update them.
If you have any questions or find parts of this tutorial incorrect, please raise an issue on Keel's repository here
Example 2: Enable automated semver updates
Once in a while (or more often) you need to update your application that's running in a cloud-native fashion inside Kubernetes.
Let's see how easy it is to do it with Keel.
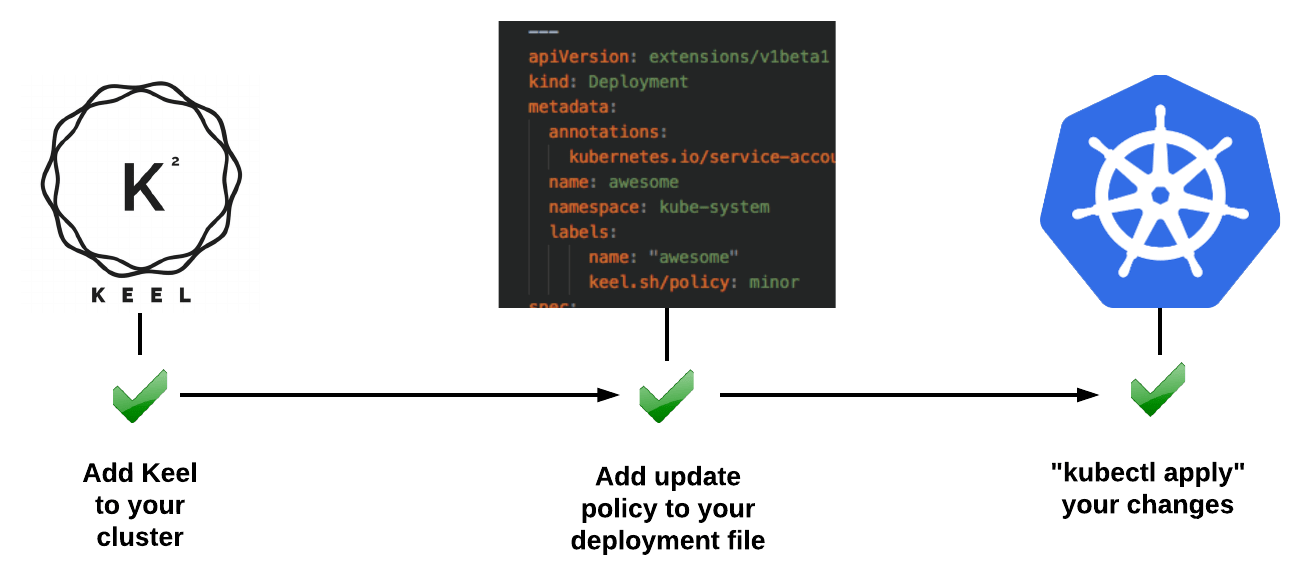
Install Keel
Installing Keel is the first step, as long as no update policies are defined in your application deployment files or Helm Charts, Keel will ignore them. You can choose your preferred installation type (kubectl or Helm) to deploy Keel, more details are available here.
Specify update policy
Our example app is 'webhook-demo' which pretty much doesn't do anything except registering incoming webhooks and showing them. Deployment file can be found here: https://github.com/webhookrelay/webhook-demo/blob/master/hack/deployment.yml.
While traditional deployment manifest would look like this:
---
apiVersion: extensions/v1beta1
kind: Deployment
metadata:
  name: wd
  namespace: default
  labels:
      name: "wd"
spec:
  replicas: 1
  template:
    metadata:
      name: wd
      labels:
        app: wd
    spec:
      containers:
        - image: karolisr/webhook-demo:0.0.8
          imagePullPolicy: Always
          name: wd
          command: ["/bin/webhook-demo"]
          ports:
            - containerPort: 8090
          livenessProbe:
            httpGet:
              path: /healthz
              port: 8090
            initialDelaySeconds: 30
            timeoutSeconds: 10
We need to add Keel policy for updates and optional trigger type.
These settings have to be specified as annotations:
keel.sh/policy: major
keel.sh/trigger: poll
Here:
- keel.sh/policy: major specifies that all - major, minor and patch versions should trigger application update.
- keel.sh/trigger: poll informs Keel to create an active watcher for the repository that's specified in the deployment file. For private repositories Keel will use existing secrets that Kubernetes uses to pull the image so no additional configuration required. Polling trigger is useful when webhooks or GCR pubsub is not availabe. If you have PUBSUB enabled for your cluster, then you shouldn't use polling trigger.
Now, our deployment file looks like this:
---
apiVersion: extensions/v1beta1
kind: Deployment
metadata:
  name: wd
  namespace: default
  labels:
    name: "wd"
  annotations:
    keel.sh/policy: major
    keel.sh/trigger: poll
    keel.sh/pollSchedule: "@every 30s"
spec:
  replicas: 1
  template:
    metadata:
      name: wd
      labels:
        app: wd
    spec:
      containers:
        - image: karolisr/webhook-demo:0.0.8
          imagePullPolicy: Always
          name: wd
          command: ["/bin/webhook-demo"]
          ports:
            - containerPort: 8090
          livenessProbe:
            httpGet:
              path: /healthz
              port: 8090
            initialDelaySeconds: 30
            timeoutSeconds: 10
          securityContext:
            privileged: true
That's it, we update our deployment with new labels, if you already have your app deployed:
kubectl apply -f your-app-deployment.yaml
And then wait for a few minutes till Keel picks up the changes and updates the workload.